|
Layout Managers in Swing
Before we start creating our user friendly windows, let's take a look at ways to arrange the components within the window. Where will our stuff be placed in the window?
The "layout" of a content pane (JPanel), is the arrangement of its components (text, images, buttons, checkboxes, radio buttons, etc.). Luckily, Java provides some pre-designed patterns for arranging the display (order) of components, referred to as Layout Managers.
In addition to controlling the layout of a JPanel, you can also control the "border" associated with a specific component. Controlling the coordinate placement of that component (similar to what we saw in Unit 9) is also possible. Remember that the initial "placement" coordinate associated with a component will be its upper left corner.
When using coordinates for the placement of components, it will be necessary to state:
//when working with coordinate placement
JPanel panel = new JPanel (null); |
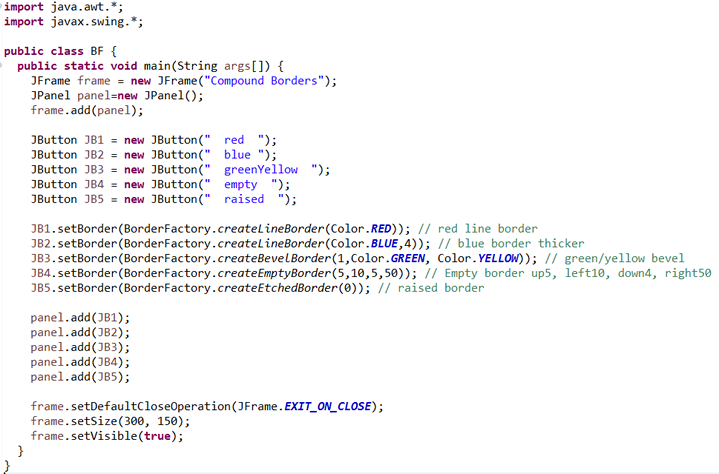
 Let's start by taking a quick look at adding borders to components.
A border can be added to most components, including a border for the content pane (JPanel) itself.
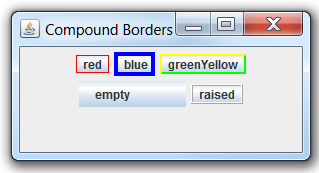
| NOTE: The BorderFactory is a toolkit for creating borders around GUI components. There are a wide range of options. |
The BorderFactory class shows many different kinds of borders from which to choose. The adding of an invisible (empty) border around a component can be used to add spacing (padding) around the component, or to add distance between components. For an invisible border, use the createEmptyBorder() method. |
 |
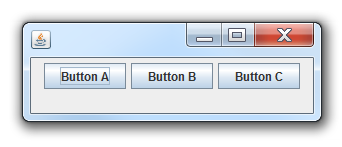
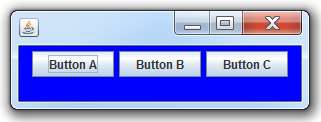
You can also set a border for a container (JPanel). This will be a line around the entire outside of the otherwise invisible JPanel.
Be sure to include import java.awt.*;
JPanel panel = new JPanel();
panel.setBorder(BorderFactory.createLineBorder(Color.red));
When using coordinates for the location of a component, the display may not appear the same on all window systems. When using a "layout manager" however, components will appear in the same locations on all window systems. Let's take a look at a few of the ways to layout a JPanel. The layout manager controls the order of the components in the content pane (JPanel).
|
A few of the available Layout Managers: |
Most Layout Managers require import java.awt.*;
//Code to activate a layout manager
JPanel panel = new JPanel();
panel.setLayout(new TypeOfManager);
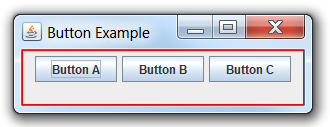
This manager is like a vertical version of the FlowLayout. Like the FlowLayout, each component is placed in the order in which it was added, and each component gets its own size. But the BoxLayout can arrange the components vertically by inserting Y_AXIS (thus causing a vertical stacking).
|
JPanel panel = new JPanel();
panel.setLayout(new BoxLayout(panel, BoxLayout.Y_AXIS));
panel.setBackground(Color.blue); |
This manager is used to arrange the components in a rectangular (matrix) grid with one component per "cell" of the grid. The components are placed in rows and columns.
Entries are added from left to right, top to bottom.
 GridLayout() GridLayout() - creates a grid with one column per component in a row. The component takes all of the available space in each cell. All components are the same size with no space between cells.
GridLayout(int rows, int columns) - creates grid layout with the given rows and columns, but no gaps between.
GridLayout(int rows, int columns, int hgap, int vgap) - creates grid layout with given rows, given columns, given horizontal gaps and given vertical gaps. (Strange, but True!) The statement new GridLayout(0,2) will establish two columns and allow the program to determine the number of rows based upon the number needed to display all of the components. The 0 creates an adjustable number of rows.
If the first parameter (rows) is non-zero, the layout will arrange the components using the number of rows (and you may get more columns than desired). If the first parameter (rows) is zero, the layout will use the second (columns) parameter instead for arranging the components. The statement above uses two columns with an automatic setting for the number of rows. |
JPanel panel = new JPanel();
panel.setLayout(new GridLayout());
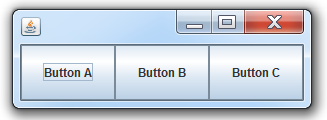 |
JPanel panel = new JPanel();
panel.setLayout(new GridLayout(2,2));
panel.setBackground(Color.green);

|
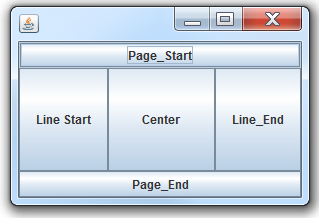
This manager arranges components to fit in five regions of the display. Each region contains only one component.
An area can be left empty, if desired.
If you want more than one component in an area, you can nest containers. |
Regions:
PAGE_START
PAGE_END
LINE_START
LINE_END
CENTER |
|
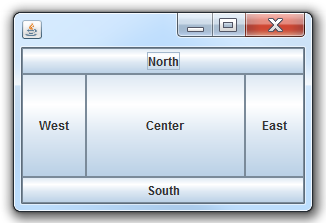
Older Titles:
NORTH
SOUTH
WEST
EAST
CENTER
|
|
The preferred size of a component may not be displayed with this manager.
BorderLayout is the default layout manager for a JFrame. |
JPanel panel = new JPanel();
panel.setLayout(new BorderLayout());
panel.add(new JButton("Page_Start"),BorderLayout.PAGE_START);
panel.add(new JButton("Line_End"),BorderLayout.LINE_END);
panel.add(new JButton("Line Start"),BorderLayout.LINE_START);
panel.add(new JButton("Page_End"),BorderLayout.PAGE_END);
panel.add(new JButton("Center"),BorderLayout.CENTER);

Return to Unit Menu | JavaBitsNotebook.com | MathBits.com | Terms
of Use | JavaMathBits.com
Notice: These materials are free for your on-line use at this site, but are not free for the taking.
Please do not copy these
materials or re-post them to the Internet, as it is copyright infringement.
If you wish hard-copies of these materials, refer to our subscription area, JavaMathBits.com.
Help us keep these resources free. Thank you. |
|