 Return to Unit Menu
 |
JavaBitsNotebook.com |
MathBits.com |
Terms
of Use |
JavaMathBits.com
Creating a JLabel
In Swing, a JLabel object allows for instructions, or other information, to appear in a GUI window. A JLabel may display a single line of text, an image (icon), or both text and an image. A JLabel does not generate an event (it does not cause something to happen).
The contents of a label can be aligned by setting the vertical and horizontal coordinates in the display area. By default, labels are vertically centered in the display area. If the content is only text, it will, by default, be positioned to the left of the display area. If the content is an image only, it will, by default, be positioned horizontally in the center of the display area.
A JLabel is the simplest way to put text (or an image) in the window for read only. If desired, this text appearing in the window can be changed by coding within the application.
 JLabel() JLabel() - default label without text or icon
JLabel(String text) - creates label with text.
JLabel(String text, int horizontalAlignment) - creates label with text & specified horizontal alignment.
JLabel(Icon image) - creates label with image
JLabel(Icon image, int horizontalAlignment) - creates label with an image & specified horizontal alignment. |
 Notice in the example below that some html coding is needed to create a second line of the text in JLabel.
 |

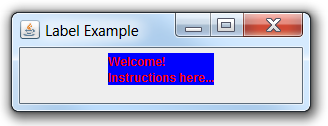
In this first example, a simple message appears in the JFrame.

Additional Options for Labels:
//Given
JFrame frm = new JFrame();
JPanel content = new JPanel();
frm.add(content); |
|
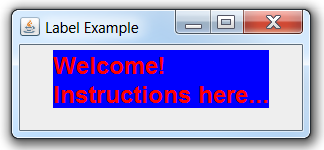
// Color and JLabels
JLabel T1 = new JLabel( "<html>Welcome!<br>Instructions here...>/html>");
T1.setForeground( Color.RED );
T1.setBackground( Color.BLUE );
//background color is ignored unless you include a setOpaque(true)
T1.setOpaque( true );
//Change text in a JLabel
T1.setText("New Message");
//Commonly used to CENTER a label
T1.setHorizontalAlignment(JLabel, CENTER);
|
We worked with controlling fonts and text size in the last unit.
We will be able to do the same in this unit with additional coding. |
|
setFont( ):
//We saw in the last unit:
Font timesBold16 = new Font("Times New Roman", Font.BOLD, 16);
Font arialBolditalic12 = new Font("Arial", Font.BOLD + Font.ITALIC, 12);
//We may now see possibilities such as:
//set font at each location
label.setFont(new Font("Courier New", Font.ITALIC, 12));
//set font for panel and reference when needed
panel.setFont(setFont(new Font("Courier New", Font.ITALIC, 12));
label.setFont(null);
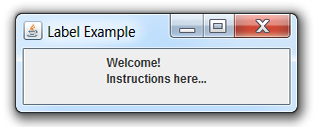
See what happens to the font size if the following code line is added to the program that created the Label Example shown above.
T1.setFont(new Font("Arial", Font.BOLD, 24)); |
 |
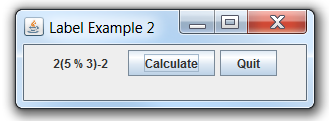
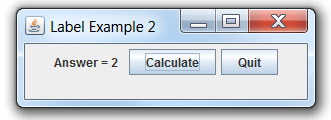
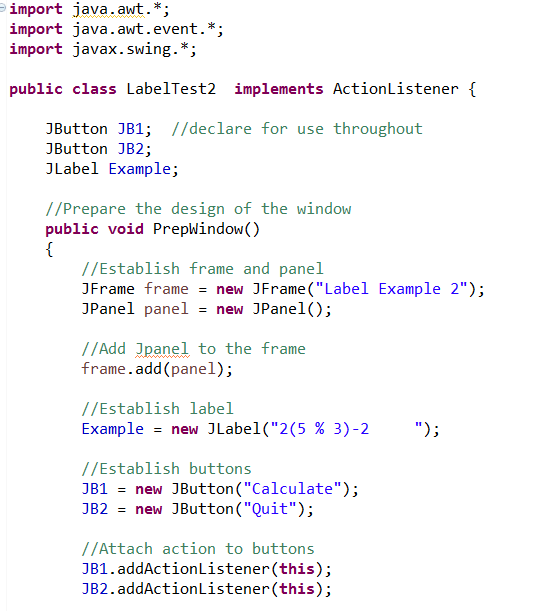
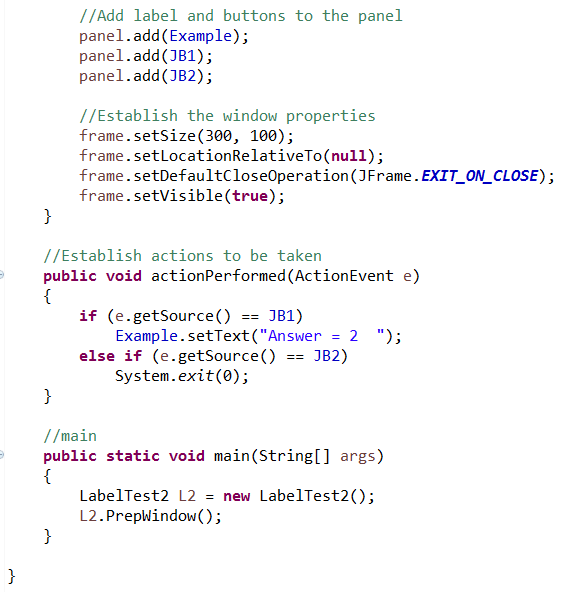
Example with JLabel, JButton, and activation.
Hitting the Calculate button will show the "simplification" to the mathematical expression. In this example, hitting the button changes the text (JLabel) that appears in the JFrame. It is also possible for a button to cause text changes in the Console window, as will be seen in a future example. (see Creating a JButton for information on buttons and activations.)
A JLabel does not (by itself) generate an event.
Thus, the example below includes two buttons that will trigger two events.